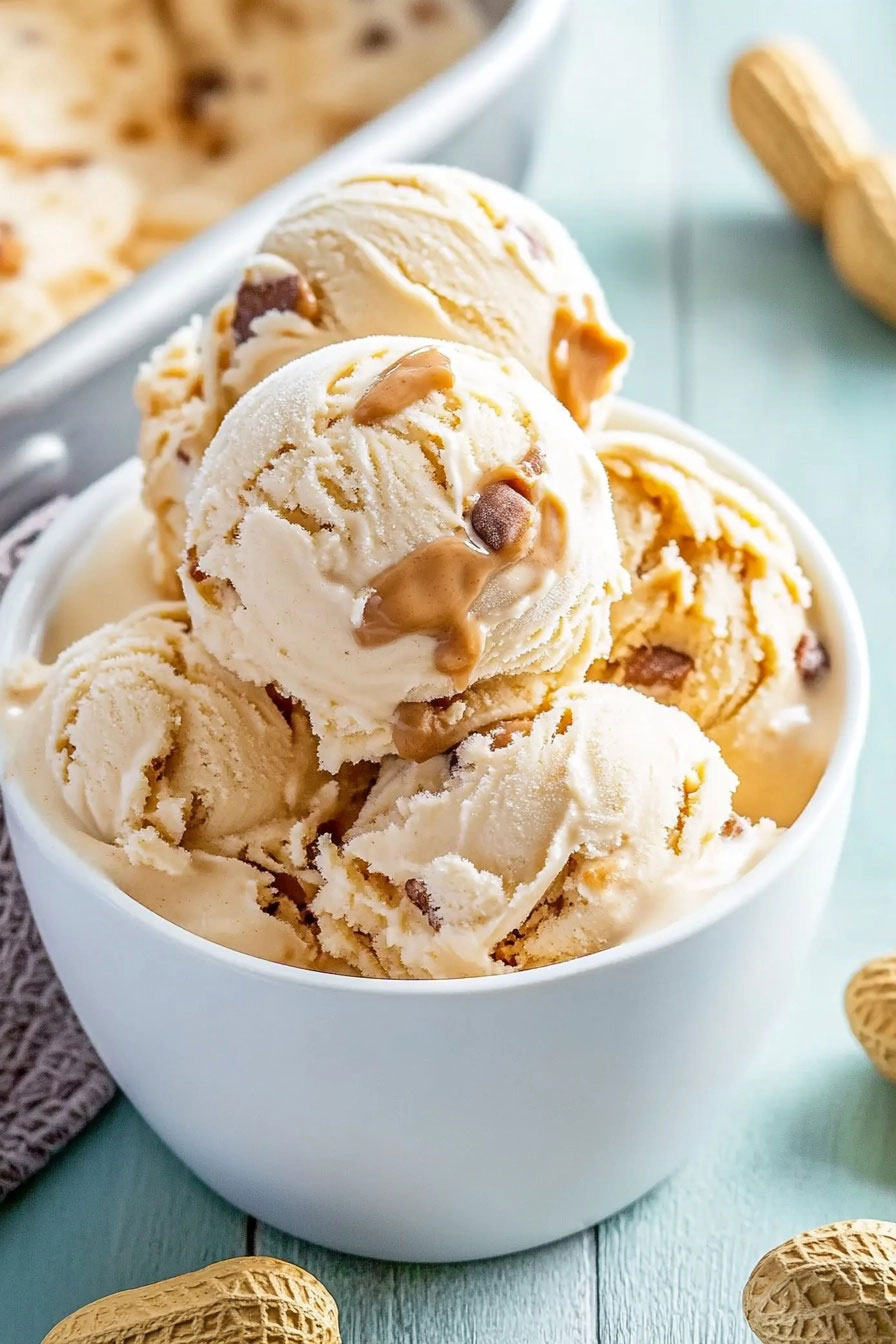
Unlock the Secret to Creamy Peanut Butter Ice Cream: 3 Ingredients, No Machine!
Imagine a scoop of luscious, velvety peanut butter ice cream melting on your tongue – rich, nutty, and perfectly sweet. Now, imagine achieving that dream dessert with just three simple ingredients and without the need for a fancy ice cream maker. Sounds too good to be true? It's not! Prepare to have your mind (and taste buds) blown with this incredibly easy, no-churn peanut butter ice cream recipe. Whether you're a long-time peanut butter aficionado or simply looking for a quick, impressive treat, this homemade delight is about to become your new go-to.
Forget the complexities of traditional ice cream making. This genius method leverages the unique properties of common pantry staples to create a dessert that rivals store-bought versions in both flavor and texture. It's the ultimate hassle-free solution for satisfying those sudden cravings for something sweet, creamy, and undeniably peanut-buttery.
The Magic Behind 3-Ingredient Peanut Butter Ice Cream
The brilliance of this no-churn recipe lies in its simplicity and the synergy of its core ingredients. Each component plays a vital role in creating that signature creamy texture without the churning process. If you've ever wondered how such a simple combination yields such spectacular results, let's break down the science and deliciousness.
Key Ingredients Unveiled: What You'll Need
- Sweetened Condensed Milk: This isn't just for sweetness; it's the magical emulsifier and anti-crystallization agent in our recipe. Its high sugar content acts as a natural inhibitor against ice crystal formation, which is crucial for achieving that smooth, creamy consistency without an ice cream machine. It also provides a foundational sweetness that beautifully balances the savory notes of peanut butter, creating a harmonious flavor profile that’s incredibly addictive.
- Heavy Cream: The backbone of our ice cream's luxurious texture. When whipped, heavy whipping cream incorporates air, transforming into stiff, voluminous peaks. This aeration is what makes the ice cream light, airy, and incredibly rich. Its high fat content contributes to the velvety mouthfeel, making every spoonful a decadent experience. The fat also helps to keep the ice cream softer when frozen, ensuring it's not rock-hard straight from the freezer.
- Peanut Butter: The undeniable star of the show! Peanut butter infuses our ice cream with its distinctive nutty flavor and contributes to the overall creamy texture. For the best results, opt for a high-quality, smooth peanut butter. Natural peanut butter (made with just peanuts and salt) often offers a more intense flavor. However, if you prefer a different texture or a touch more sweetness, a regular creamy variety works wonderfully too. Feel free to experiment with crunchy peanut butter if you love pockets of nutty texture in your dessert! Want to try making your own? While a high-power blender is needed for homemade peanut butter, using a good quality store-bought option is perfectly convenient and delicious.
Whipping Up Your Dream Dessert: Step-by-Step Guide
Creating this irresistible peanut butter ice cream is astonishingly simple. Follow these steps for perfect results every time:
- Prepare Your Peanut Butter: Gently warm your peanut butter in a microwave-safe bowl for about 15-30 seconds, or until it becomes slightly runnier. This makes it much easier to mix evenly into the batter, ensuring consistent flavor throughout. Be careful not to overheat it; you want it warm and fluid, not hot.
- Whip the Heavy Cream: In a large, chilled mixing bowl, pour in your heavy cream. Using an electric mixer (handheld or stand mixer), whip the cream on medium-high speed until it forms stiff peaks. This means that when you lift the beaters, the cream stands up firmly. Over-whipping can turn it grainy, so stop as soon as stiff peaks are achieved. This aeration is key for a light, airy ice cream.
- Combine the Base: In a separate bowl, gently fold the slightly warmed peanut butter into the sweetened condensed milk. Mix until just combined and smooth.
- Fold in the Whipped Cream: Now, carefully add about a third of the whipped cream to the peanut butter and condensed milk mixture. Gently fold it in with a spatula to lighten the base. Then, add the remaining whipped cream in two more additions, folding very gently until no streaks of white cream remain. The key here is to maintain as much of the air in the whipped cream as possible, so avoid overmixing. This careful folding is crucial for that soft, airy texture.
- Customize (Optional): This is where the fun begins! If adding any mix-ins like chocolate chips, crushed pretzels, or roasted peanuts, gently fold them into the mixture now. For ideas on endless variations, check out our guide: Fast Homemade Peanut Butter Ice Cream: Endless Flavor Combos.
- Freeze to Perfection: Transfer the ice cream mixture into a clean, airtight container. To prevent ice crystals, choose a container that minimizes air exposure. Place it in the coldest part of your freezer to ensure rapid and consistent freezing, minimizing temperature fluctuations. Freeze for at least 4-6 hours, or preferably overnight, until firm.
Elevate Your Experience: Customization and Serving Tips
While the basic 3-ingredient peanut butter ice cream is phenomenal on its own, there's a world of possibilities to explore when it comes to customizing flavors and textures. Turn your simple dessert into a gourmet creation!
Beyond the Basic: Exciting Variations and Toppings
- Crunchy Delights: For an extra layer of texture and intensified peanut flavor, sprinkle roasted peanuts (whole or crushed) into the mixture before freezing, or directly on top of your scoop.
- Chocolate Lover's Dream: Peanut butter and chocolate are a match made in heaven! Swirl in some chocolate syrup or melted chocolate, or fold in chocolate chips, chocolate chunks, or even mini peanut butter cups.
- Sweet and Salty Bliss: Crushed pretzels or a drizzle of salted caramel sauce can add a delightful salty contrast that enhances the sweetness of the ice cream.
- Fruity Twist: For a unique flavor profile, mash in ripe bananas for a banana peanut butter ice cream, or swirl in dollops of your favorite jelly for a PB&J inspired treat.
- Nutty Alternatives: While peanut butter is king here, feel free to substitute it with almond butter, hazelnut butter, or even a mixed nut butter for a completely different yet equally delicious experience.
- Coffee Kick: For a sophisticated twist, dissolve a teaspoon of instant espresso powder in a tiny bit of hot water, cool it, and swirl it into the peanut butter mixture for a coffee peanut butter ice cream.
Lighter Options and Smart Swaps
While this peanut butter ice cream is undeniably rich and satisfying, you can make slight adjustments if you're looking for a lighter version without sacrificing too much of that creamy goodness. Peanut butter, while high in protein, is also dense in fat. To reduce the overall fat content, consider replacing up to a quarter of the heavy cream with full-fat milk. Add the milk after whipping the cream, folding it in gently. Another option is to use a reduced-calorie sweetened condensed milk, if available. These subtle changes can help lighten the dessert while still delivering fantastic flavor and texture.
Serving Suggestions for Perfection
To enjoy your homemade peanut butter ice cream at its absolute best, let it sit at room temperature for about 5-10 minutes before scooping. This allows it to soften slightly, making it easier to scoop and revealing its ultimate creamy texture and rich flavor. Serve in bowls, cones, or as an accompaniment to brownies or apple pie for an extra indulgent treat. For a truly unforgettable dessert that celebrates the simplicity of this method, consider checking out The Ultimate 3-Ingredient Peanut Butter Ice Cream for PB Fans.
Why Choose Homemade No-Churn Peanut Butter Ice Cream?
Beyond the sheer deliciousness, there are numerous compelling reasons to embrace the world of homemade no-churn peanut butter ice cream:
- Unbeatable Freshness and Flavor: When you make it yourself, you control the quality of ingredients, resulting in a taste that often surpasses store-bought varieties. The peanut butter flavor is vibrant and authentic.
- Effortless Convenience: With no specialized equipment required and minimal hands-on time, this recipe is perfect for busy individuals or spontaneous dessert cravings. It truly is "mix, chill, and wait."
- Customization at Your Fingertips: From adding your favorite mix-ins to experimenting with different nut butters, you have complete creative control over your dessert. Tailor it precisely to your preferences every time.
- A Sense of Accomplishment: There’s a unique satisfaction that comes with creating something so delicious from scratch, especially when it's as easy as this recipe.
Making creamy peanut butter ice cream at home doesn't have to be a daunting task. With just three basic ingredients, a little whipping, and some patient freezing, you can create a dessert that's rich, smooth, and bursting with that beloved nutty flavor. So, gather your ingredients, clear some space in your freezer, and prepare to delight yourself and your loved ones with this incredible no-churn creation. It's a testament to how simple ingredients can combine to form something truly extraordinary!
